
Be sure to check out the excellent illustrated guide to 56 different boat builds from mater boat builder Martin Reid.
Contents
How to build a flat bottomed boat
So, how do you build a flat bottom boat?
Most homemade flat bottom boats are Jon boats made from low-priced plywood that’s very easy to work with.
Begin by building the boat bottom, then add the transom, sides, bow and prow.
Then add trims, seating, a storage unit and fittings before applying the finish.
Below we cover these steps in detail.
The initial planning phase of your flat bottom boat build requires you to decide on the overall design plan of your boat, the material you will use to build it and the construction method you will employ.
The main materials that can be used to build a flat bottomed boat are aluminum, fiberglass, plywood, and solid wood.
As plywood is the cheapest material available and the easiest to work with it is the most popular material used in DIY flat bottom boat-build projects.
Most homemade flat bottom boats are built on a Jon boat design because Jon boats are popular utility vessels used for fresh water fishing, duck hunting and transportation through shallow waters.
Their simple no-frills design also makes them ideal for a home-build project.
As a Jon boat is the most popular flat bottom boat deign used for home-builds and plywood is the cheapest and easiest material to work with (as well as being the most popular) we have chosen this material and this boat design for our home construction project.
If you require plans for other flat bottom boat types (or any boat type) or want to work with a different material please go here for a variety of different detailed boat plans.
If you are happy enough to proceed with the building of a plywood Jon boat then you will begin your build from the bottom up.
You first build the bottom of the boat, then add ribbing before adding the transom.
Then you construct the sides (starboard, and port), add the bow and finally the prow.
After the hull is formed you will add seats and a storage unit at the prow before adding trims for a more pleasant look.
At this stage you can apply some finish and fit-outs.
Let’s look at these construction stages in much more detail.
10 flat bottom boat designs
The unique hull design on a flat bottomed boat allows the boat to traverse shallow bodies of water that other boat types could not navigate.
This is because the flat two-chinned hull means a flat bottom boat is much less likely to ground in shallow waters.
It is also less likely to damaged by rocks and other debris that can lie several inches below shallow water surface.
Flat bottomed boats come in a variety of designs. Not all are suitable for a home-build project.
The different types of flat bottomed boats usually tackled as a DIY build include:
- Jon boats
- Air boats
- Dory boats
- Durham boat
- Bateau
- Gondola
- Pirogue
- Punt
- Sandolo
- Some high-speed runabouts
The most popular type of flat bottom boat design tackled as a DIY building project is a Jon boat.
Which is the best material for a flat bottom boat?
Although we have given you detailed instructions for building a plywood flat bottom boat there are other materials that you can use.
Wooden flat bottom boats have been popular for hundreds.
However, due to their lightweight nature, ease of mass production and their ability to withstand abuse, the popularity of both aluminum and fiberglass flat bottom boats has exploded in modern times.
Aluminum boats are the most robust of the three materials used for flat bottom boat construction.
Aluminum may be expensive to source for manufacturers but from a user’s perspective it offers low maintenance costs and longer durability while being lightweight and very robust.
Wood is the best material for DIY Jon boat build
Wooden boats on the other hand are not only very practical, cheap to make yourself and fairly easy to manage but they also look very beautiful especially when varnished.
They also tend to be strong and lightweight. Mankind has been making wooden boats for thousands of years for a reason!
On the flip side, hardwood boats are difficult to build on your own and you might be required to enlist the help of a professional boat builder if you want to own a custom one.
Wood is also a lot less durable than the other materials and does require some maintenance if you want to ensure its longevity.
Fiberglass boats are much stronger than wood and a lot lighter.
They are by far the easiest boat to maintain as they are very robust, capable of taking a lot of abuse and require very little, to no, maintenance.
Should you build or buy a flat bottom boat?
To buy or to build? That is the question.
On paper buying a ready-made boat looks like the best most hassle-free option when compared to the tedious work associated with building your own.
To some extent this is true but buying does have drawbacks of its own.
For the die-hard DIY enthusiast buying a ready-made Jon boat should never really be an option.
Why should you make your own wooden flat bottom boat?
Well when you buy a ready-made boat, you miss out on the chance to customize it to suit your own needs.
And of course, building one is much cheaper than buying one especially when you can make an excellent Jon boat from cheap plywood as detailed above.
If you buy a boat you will also miss out on the true satisfaction you get from building your own.
So, go ahead and give it a go.
How to build a DIY Jon boat. Jon boat plans
This boat is very popular because it is an ideal shallow water utility boat and can be used for transportation, fishing and duck hunting in extremely shallow waters as well as other more commercial activities.
To learn more about what a Jon boat is go here.
Jon boats are the most common flat bottom boat design used for DIY build projects.
This is not only because they are excellent shallow water utility boats, and the number one choice for inland fresh water fishing and hunting, but also because their simple design makes them relatively easy to construct.
 They are also popular because they are very pocket friendly, both to buy and to build.
So, rather than give you detailed instructions on how to build every type of flat bottom boat on the list above, which would require a book rather than a website post, here are detailed instructions for building a flat bottom Jon boat.
Because plywood is very buoyant, really budget-friendly and extremely easy to work with we will outline how to build your Jon boat from plywood.
If you require plans for other types of boat or want to use a construction material other than plywood you can get over 500 detailed boat building plans here.
Which construction method?
The construction method applied to a boat-build is largely dependent on the construction material being used.
For example, carvel construction is a method used for building a solid wood boat while molding is applied when building a fiberglass boat (though you can build a plywood boat and coat it with a fiberglass finish).
As the method used for building a plywood Jon boat boat is the most “user-friendly” this is another reason behind our decision to chose this construction material.
Just as different construction methods are needed when using different materials, different tools and equipment are also required.
For example, welding equipment is needed when building an aluminum boat and a mold or plug must first be constructed for a fiberglass build.
However, only simple common wood tools, that you most likely already have at home, are all that is needed for building a plywood boat.
Construction glue and other more specialized materials can be sourced cheaply locally or online.
How to build a plywood flat bottom Jon boat. Wooden Jon boat plans
Home-made plywood boats are very popular nowadays due to the availability of good plywood, its cheap price, how easy it is to work with it, and because it is so buoyant.
Plywood is easier to work with than other types of materials. Additionally, the actual construction method utilized when building a plywood Jon boat is much less complicated than those employed when using other materials such as aluminum.
Although plywood is a great material to use for a Jon boat build project, especially if it is your first, using this material does have some drawbacks that you should be aware of.
For example, plywood rots very easily and is therefore not as durable compared as other materials.
A plywood boat obviously requires a greater effort to protect the wood (water ingress and subsequent rot) from water erosion and therefore requires more maintenance to ensure it stays waterproof.
Having said that, plywood is definitely the best material to use as far as budget, ease of build and speed of build is concerned.
And, if you look after your boat it should last you a very long time.
The first step when building a plywood flat bottomed boat is to ensure you have the correct tools and materials that will be needed during the building process.
Tools and materials you will need
Before you begin make sure you have all necessary tools to complete the job.
Here is a list of the tools you will need for your DIY Jon boat build:
- A staple gun
- Pipe clamps
- A compass
- A caulk gun
- A meter saw
- A table saw
- Clamps
- Ratchet
- A circular saw
- Exterior screws
- A jig saw
- A straight edge ruler
- An impact driver
- A drill driver
You also need to source the required materials.
Materials you will need include:
- Polyethylene glue
- Wood glue
- Oak solid stock (small)
- Poplar solid stock
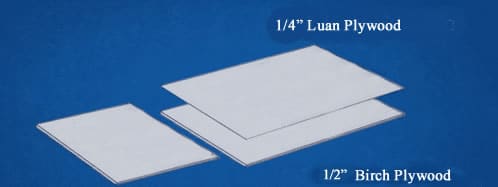
- ½” and ¾” birch plywood sheets
- ¼” Luan plywood sheets
- Birch solid stock
- 1″ foam insulation
- Spar urethane
- Waterproof paint and brushes
- Water and rags
- 30″ x 30½” thick, clear Plexiglass plate (optional)
Flat bottom boat plans
Now that you’ve sourced the tools, equipment and materials you need it’s time to build your first plywood flat bottomed boat.
Below are the flat bottom plywood boat plans, that will allow you to quickly and easily assemble a plywood Jon boat cheaply.
These plywood Jon boat plans are split into 3 convenient step by step boat building sections.
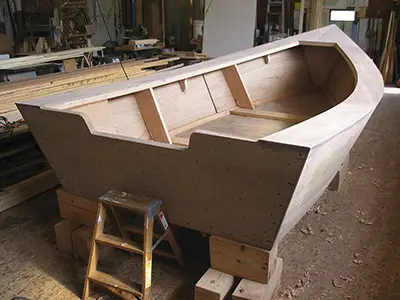
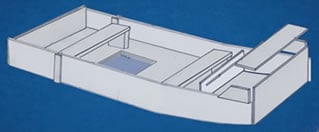
Part 1. How to build a wooden Jon boat
Step 1: Start the Jon boat build at the bottom
A boat is normally longer than a sheet of plywood and therefore, you will need to join two or more sections of plywood to form the bottom (floor) of your boat.
For our boat we will use 2 sheets only.
For the shorter back piece of the bottom, use ¾” normal plywood.
The front piece requires a ½” piece of birch plywood that is wood-glued to ¼” Luan plywood as shown in the image below.
The reason we use a combination of two different wood types on the front piece is because they will be easier to bend into the distinctive Jon boat bow curve, than a single ¾” piece of normal plywood.
Step 2: Cut the plywood and shape the bow
To give the boat front its unique curved shape the front sides must first be tapered.
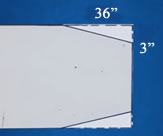 At the edges of the front piece measure 36” along the length and 3” along the width.
Draw a line to join the ends of the marked lengths.
This will form a triangular type shape as shown in the image to the right.
Cut along the line to remove the triangle using a jigsaw.
Follow this process for both sides.
On a flat working platform such as a raised table, push the back piece and the newly cut front piece together (keeping the cut part to the front, before you proceed to the next step).
Step 3: Prepare the bottom and the ribbing
To guide you on where the sides will be installed, draw a ¾” template line, using a compass, along the entire edge of the bottom.
The line will act as a guide for the placement of the sides, front and back of your boat.
Next we will build the ribbing.
Using a table saw, cut some poplar stock into 1½ inch wide strips.
You will need to cut enough strips to run along the entire marked line.
Next, temporarily fix the poplar stock along the line and onto the bottom with screws.
This will be removed later before being permanently fixed in place.
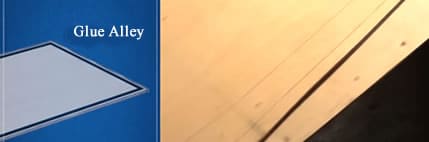
Using a pencil, trace the poplar stock to form the glue alley.
The glue alley is used to mark the area where you will place your glue to hold the ribbing in place.
To conceal the seam between the front and back pieces of the bottom’s plywood, and to make the joint stronger, cut a 3 x 2” stock piece and temporary fix it at the joint.
Like the poplar stock used for the ribbing you now need to temporarily screw this piece evenly over the seam.
You will also remove this later before replacing it permanently.
Once in place trace the front and back edges on the boat floor to marks its position and form another glue alley.
Again, you will use this glue alley as a guide when putting down the glue to affix the seam-piece in place permanently.
You can now remove the ribbing that you temporarily screwed in place.
Once you remove the ribbing you’ll see the two lines you drew. This is the glue alley.
In this glue alley you will add polyethylene glue.
Before adding the glue run a wet rag in-between the lines as polyethylene glue is activated by water.
Add plenty of polyethylene glue to the glue alley (between the lines) in a zig-zag fashion.
Repeat this process on the bottom of the ribbing (the part that will sit on the boat floor).
Once the glue is in place, you can permanently fix back the ribbing by screwing it in place every 6 – 8 inches.
The combination of glue and screws will give it a string hold.
Now remove the seam-piece that connects the front and back and repeat the water and glue process. Screw back into place.
Allow the glue to set before moving on to step 4.
Step 4: Shape the bottom into a curve
The curve shape of a Jon boat enables it to cut through the water and you have already made some preparations to create this when you glued Luan and birch plywood together to form part of the boat bottom.
To create this curve lift the front end of the boat floor, with the triangle cuts removed, and beneath it place a 2 x 6” wood piece as shown in the image below.

Clamp the bottom of the boat to your work bench (or whatever you are working on) using a 2 x 4” just past the taper.
This clamping will force the front to curve as shown in the image below.

The combination of Luan and birch plywood bends more easily than 3/4″ plywood and that’s why you created that combination at the start.
That is the part you should bend.
Remove the clamps and the pieces of wood.
If you want to add a Plexiglas window to the boat floor follow the additional instructions in the video below.
Step 5: Build the sides of the boat
Like the boat floor, a boat’s sides are usually longer than a normal sheet of plywood.
Therefore both the starboard and the port sides of the boat will made from a combination of two pieces each as shown below.
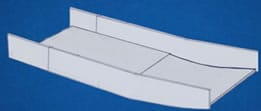
To build the sides measure and use a table saw to cut the plywood into sizes that match the floor of the boat.
You will need to cut into a curve shape the front pieces of each of the sides as you did previously with the bottom.
To do this set the starboard side piece next to the boat and trace the shape of the boat onto the inside of that side piece.
This will allow you to cut the side into shape where the curve is.
Repeat this for the port side.
Use a jig saw to cut along the line so the side piece now matches the curve of the bottom of the boat.
Attach both sides with water and polyethylene glue.
Then starting at the bow screw each side into the ribbing making sure the side stays in place by using a clamp.
The side screws should be 4 to 6 inches apart to ensure that the sides are firmly fixed.
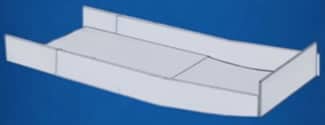
Step 6. Cut and attach the prow
Next you will cut and attach the prow.
The prow needs to be 4″ taller than the sides of the boat to protect against water entering the boat as it dips while moving.
Ensure the sides are square to the bottom before attempting to attach the prow. If they are not adjust them with a clamp.
Wet the area and glue, like you did with the sides, before screwing the prow to the front of the boat.
Part 2. How to build a wooden Jon boat
If you have decided to add a Plexiglas window to the bottom of the boat then it is at this stage you must complete that job before moving on.
Details are in the video below.
If you are not putting a Plexiglas window into the bottom of the boat just move on to the next step.
Step 7: Add 1 inch layer of foam board
A 1″ layer of rigid foam insulation will now be added to give the boat extra buoyancy.
Be aware that because we are placing the foam inside the boat it will not give it extra buoyancy when in use as outlined here.
The purpose of this is to help the boat float should it take on too much water and begin to sink – thus giving you more time to react, ensure crew are safe and to remove expensive equipment.
Start by tracing and cutting pieces along the bottom in-between the ribbing.
Then attach the foam using construction adhesive and screws. Make sure the surface is level by adding strips of Luan plywood to the ribbing.
Step 8: Install the decking
Now it’s time to install the deck. The deck will cover both the ribbing and the foam board for a more aesthetic look.
Install the decking by placing Luan plywood on top of the boat.
Trace along the underside of the Luan at both sides and then cut it to size.
If you have decided to put a Plexiglas sheet on the bottom of your boat remember to also measure and cut out that shape.
Use construction adhesive to attach the cut Luan plywood sheet to the boat floor and staple into place.
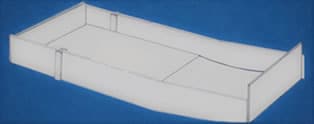
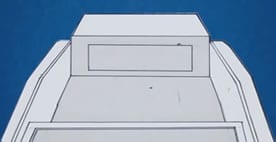
Step 9: Add the Transom
Now we can add the transom to the stern of the boat.
Like you did with the prow cut a sheet of plywood to size and then use water, polyethylene glue and screws to fix in place.
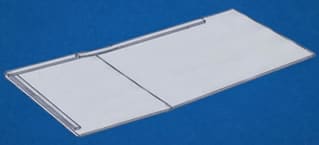
Before you finish you will want to mend the seams between the front and back side pieces.
Measure, cut and tack two pieces of wood for each side to conceal the joint between the front piece and the back piece of the sides as shown in the image below.
Step 10: Add skiffs
Skiffs are a preventative measure that protects the boat hull from sustaining damage while docking at a rocky beach or when it hits obstacles in very shallow waters.
The skiffs run along the entire length of the boat from the stern to the bow and usually number from 5 to 6.
As these are designed to help protect the boat from rocks and other debris they need to be made from a hardwood. Oak is ideal.
Turn the boat upside down.
Then measure and cut to size the skiffs from solid oak stock. Just a few inches in width is enough.
Attach them with water, polyurethane glue and exterior screws.
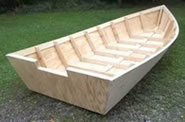
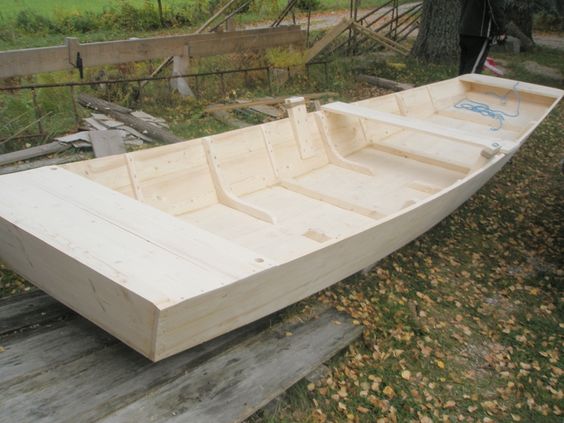
Step 11: Add the benches
Your boat is really starting to take shape now and it’s time to turn your attention to the interior.
So the next step in your build involves installing benches for seating.
These benches should be 3½” lower than the sides of the boat. Make the legs of the bench by cutting 2 x 8″ timber and attaching them to the sides of the boat.
The bench seats that sit on top of the legs are typically made of 2 x 10″ timber that is cut to the width of the boat and screwed to the legs.
Tip:
If you have placed a Plexiglas window on the floor of your boat be sure to place the benches at an appropriate distances from it so as not to obscure the view.
Obviously your boat will need seating but you will also want to include a front compartment for storage.
Step 11: Add a storage compartment
The storage compartment will be made of five pieces of ¾” plywood and is built directly into the prow of the boat.
This compartment can be as big as you need it to be.
Start by cutting 2 side pieces giving them a 45 degree angle at the ends. Attach to the sides of the boat using a cleat. Glue and screw to secure them in place.
Next cut a front piece that is the width of the boat and the same height as the sides. Rip a 22½ degree angle at the top.
Place it on the bottom of the boat before tracing a line along the back. You will use this line to lay down a cleat for help with support.
Screw the cleat into the bottom. Measure and cut an opening for the door. Keep the cut out as you will use it as the door.
Next take a sheet of plywood and rip a 22½ degree angle along one side and dry fit to the prow. Trace it and cut it to size.
Attach the cut piece to the prow and the front sides.
Rip one last piece of plywood with a 22½ degree angle along the side, mark it and then rip another 22½ degree angle along the other side.
Tack the the two top pieces together and then attach the front piece.
Wet the area and apply polyethylene glue before screwing into the sides of the boat and tacking it into the cleat.
Now take the cut out you have from cutting the opening in the front piece and attach it using a piano or door hinge.
Add a handle and a simple door latch.
Step 12: Add some trims
Trims are made from 1½” poplar stock.
Wet, glue and staple the trim along the outside edges of the sides, the seats and the storage compartment.
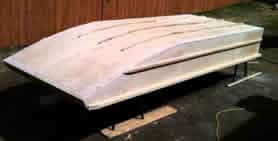
Step 13: Waterproof and paint the Jon boat
Before the paintwork, add multiple layers of spar urethane to ensure that the boat remains completely waterproof.
Don’t skimp on this as the spar urethane is the main barrier between you and a wet dip. Leave each coat a day to dry before applying another coat.
After the spar urethane has dried, apply the first coat of paint being sure to use a high quality outdoor waterproof paint for extra protection.
Leave the paint to dry over a period of 24 hours.
After the first coat has dried apply another layer of paint and give it 24 hours to dry.
For a great look consider using a good quality waterproof varnish, like this Ronseal exterior yacht varnish, on the interior with solid bright color on the exterior.
Part 3. How to build a wooden Jon boat
Step 14: Install fit-outs
For a Jon boat to be fully functional, you may want to attach fit-outs such as railblaza mounts, fishing rod holder, berley buckets, etc.
You can add a range of different cool things on your boat to fully customize it to suit your needs.
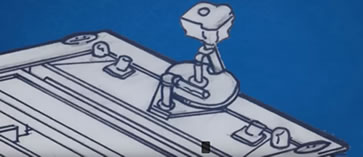
Step 15: Attach your own homemade outboard motor
Of course now that your boat is finished you can attach oar locks, as outlined here, or an outboard motor. But why buy an outboard motor when you can make your own.
This will mean your entire boat has been fully constructed by you! Not many people can make that claim.
So, if you want to ensure your entire boat, from bow to stern and motor, is completely DIY, or if buying a new outboard motor is outside the boundaries of your budget, then you can easily make one with just a propeller and a weed whacker!
Tools you’ll need:
- Grinder with flap wheel
- Propeller
- Galvanized pipe
- Pine wood
- Hammer
- A good weed whacker
Start by disconnecting the shaft of the weed whacker and splitting it into 2 pieces.
Next remove the nylon string head which will expose the mounting bolt. You will use this bot to attach the propeller.
Most likely the nut will be too big for the propeller so you will most likely have to grind it down to size.
Once you’ve finished grinding the nut add an expanding sleeve anchor and a carriage bolt in order to help secure the propeller.
Slide the propeller on and secure in place.
Obviously, the type of propeller you use is important as a weed wacker engine is limited in its power.
A plastic propeller is probably best due to its lightweight.
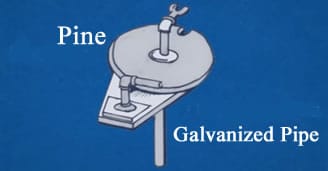
Re-attach the 2 pieces before mounting your new homemade outboard motor to your boat.
To mount the motor you will need a circular piece of pine wood and some galvanized pipe as outlined in the video below.
How to make a homemade Jon boat more stable
Now that you’ have these Jon boat plans and can now make your own wooden flat bottom boat out of plywood, you may want to take steps to stabilize it.
Keeping a flat bottom boat stable in calm water is not a problem, however when it comes to choppy waters things get a little more complicated.
Stabilizing a Jon boat when the weather changes for the worse can be a very tricky affair, especially if you are carrying a large load.
The last thing you want to happen is for your boat to sink with people and expensive equipment onboard.
Here are some tips that will ensure that your flat bottom boat remains more stable and avoids sinking:
- Build or buy a boat with a wider bottom. The bigger a flat bottom boat is, the better is its stability, especially if it carries heavy loads.
- Add external flotation pods to the stern for buoyancy and stability.
- Use PVC tubes at the sides. Attach two 10″ wide, 10 foot long PVC pipes along both sides of the Jon boat at water level. The pipes must be capped and sealed to make sure no water can get in.
- Install a deck in your boat if it does not have one. A deck will add weight to the boat making it more stable.
For more detailed information about the above methods and for much more information read the article How to Make a Jon Boat More Stable.