If you include fishfinders, search lights and other electronic goodies to your build then the wiring of your Jon boat can start to seem like a messy and daunting task.
Not to worry we are here to show you the basics of wiring your boat.
Contents
When you need to know a bit about boat wiring
If you are ready to do more with your Jon boat than resting on your oars, you will need to add power to your set-up.
Obviously the most common component on a boat, especially a Jon boat, which requires power is the trolling motor.
But, depending on the use of your boat there are a wide variety of other components and accessories that may need to be battery powered.
Battery operated boat components that need to be wired include:
- Navigation lights.
- Deck lighting and accessory lights.
- Bilge pump.
- GPS.
- Fish finders and Sonar.
- Control panels.
- On-board power banks and charging points.
Simultaneously connecting a range of items that a Jon boat needs to perform well for recreational boating, angling or hunting requires some basic electrical knowledge. It also requires a sound and logical approach to wiring your boat.
There are various approaches you can take for your Jon boat wiring set-up, and the approach you take will depend on your resources, the equipment and tools you have to hand and the functionality you want to achieve.
Staying safe should be your top priority when wiring a boat!
The most important thing to keep in mind before you start any electrical work on your boat is that electric is dangers even from a relatively small 12 V battery.
This is never more important than it is on a boat where you will be surrounded by water.
Boat wiring must be 100% protected from the elements as water is an electrical conductor – electric and water don’t mix well!
Untidy, piecemeal patch wiring jobs are dangerous and carry the risk of damage to your equipment, can start fires or even cause bodily harm or a fatality from electrocution.
55% of US Coastguard investigated boat fires are caused by faulty wiring. So, it is critical that you get the wiring of your boat right.
We have provided this information to give you an approach for wiring your boat effectively.
We strongly advise calling a professional marine electrician or surveyor if you feel out of your depth.
Be sure to also to use an electrician to review and ensure that the work you have undertaken yourself is electrically sound.
Key principles to wiring a boat
In this article we will outline key points and principles for basic wiring of your Jon boat with inclusion of a control panel to keep everything organized.
Wiring your Jon boat is as simple as following a boat wiring diagram.
However you need to be aware of how to insulate and protect your electrical wires and connections before you begin.
We have included a video for wiring a Jon boat and several electrical boat wiring diagrams as well as links to some excellent additional resources.
These will assist you in accomplishing this task more effectively.
There is also a list of key pieces of kit that you will need to complete the job and also that will give a more resilient finish to your work.
11 items you will need to wire your Jon boat:
- A battery. Ideally you should have 2 batteries though for light electrical loads 1 battery will probably suffice.
- A main battery switch.
- A control panel.
- A reel of marine grade primary wire 8-14 AWG depending on the size of your boat.
- A negative bus bar.
- Waterproof in-line fuses.
- Spiral wrap or wire conduits.
- Wire ties.
- Wire tie mounts.
- Marine-grade butt connectors.
- Heat shrink wire wrap.
In addition you will need a regular selection of tools including a pencil or marker, wire cutters, pliers, drill, screwdrivers, a heat gun, hole saw and handheld power saw.
Protective eye-wear, gloves and a face-mask are also advisable.
Wiring a Jon boat can appear to be a daunting task when you first approach it but with careful planning and a good guide you can wire your boat in a single evening.
Plan and organize your boat wiring set-up before you begin – use boat wiring diagrams
- You will need to sketch out or acquire a simple wiring plan for your boat which outlines the layout of the circuitry that needs to be connected. This will help in planning the equipment you need, wire lengths and key connections in your boat wiring. We have included several layout boat wiring diagrams (including a basic boat wiring diagram, a 2 battery boat wiring diagram, a full spec small boat wiring diagram and a Jon boat wiring diagram), at the end of this article.
- Ensure you identify and distinguish your positive (usually red) and negative (typically black) terminals on your battery, the control panel, and all the accessories that will become part of your Jon boat wiring set-up. Match like with like at all times.
9 Key points for wiring a boat switch panel
- Power runs from your onboard battery to your control panel from which the power will be distributed to your connected equipment. The switches on the control panel essentially act as circuit-breakers that cut off power to the equipment that is not in use.
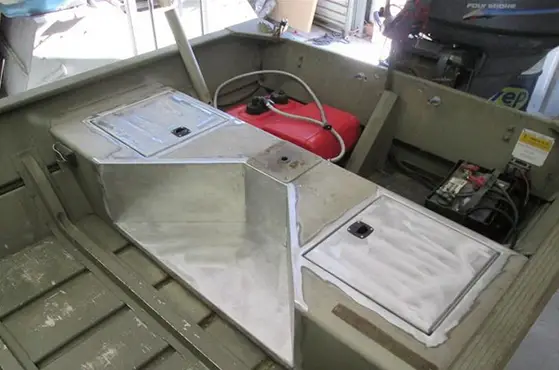
- You will need to correctly position all accessories and boat equipment, that is to be wired, in the correct place on your boat so you can run adequate lengths of your marine cabling to them. For example, if you are connecting a deck light make sure you position the light in the exact location on the deck where it will be used before you connect it to the battery or you may find that the cable you allocated for the connection is too short!
- Lay out and cut all the relevant lengths of cable on the boat according to your set-up boat wiring diagram. How many cables do you need? Cut that amount making sure you have enough length in each cable.
- When working with marine grade wire, have plenty on hand, and leave slack in your work for re-positioning, making corrections, upgrades and for making your final connections.
- It may be helpful to approach dealing with all positive wiring first and once that is completed focusing on the negative wiring connections afterwards.
- Your control panel will have connectors that allow you to splice wiring from your equipment into the control panel. You will need to attach complementary connectors to all wiring coming from your Jon boat equipment.
- Wire ends should be connected with appropriate marine-grade butt connectors. Install these heat shrink terminals using a heat gun to create a watertight seal. Heat shrink wire wrap can also be used to group wires together if needed.
- The connectors you use must be marine grade (corrosion resistant) and match the gauge of wire you are working with.
- A negative bus bar is used prior to connection of the negative wiring to the negative battery terminal to handle your boat’s negative load.
How to hide the boat wires after wiring a boat
Masses of tangled and improperly connected boat wires are not only unsightly, they are dangerous!
Once you have established your wiring arrangement you can hold all your wiring together using a flexible wiring conduit of appropriate length.
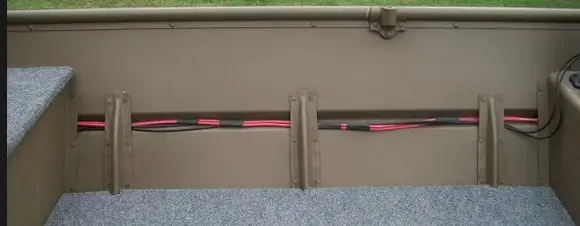
You can also use cable ties and cable tie mounts.
In keeping with The American Boat and Yacht Council recommendation make sure electrical wires are secured at a minimum of at least every 18 inches.
3 ways to ensure that your boat electrics are properly protected
- Avoid overloading your writing, as this can cause short circuiting and fires.
- Fuses and circuit breakers should be sized below the amp rating of the equipment and accessories that are being protected.
- The American Boat and Yacht Council advises that they should be located within 7 inches of wire length from your power source.
- Do not use wire nuts for connections in your boat wiring, use ring or spade terminals with heat shrink tubing.
How to insulate boat wires
BC-5W2 is specialist marine wire that offers a suitably high level of insulation and quality stranded tinned copper wire within it.
This wire is specifically manufactured to withstand the corrosive and abrasive environment experienced on boats.
Electrical tape, sleeves, padding and seals can also be used to insulate and protect your wiring, especially if it is run behind the ribs of the boat.
Videos and resources for successful & safe boat wiring
Video with easy practical steps for wiring a boat
This is a relaxed run-through of the key steps you need to take to successfully wire your Jon boat.
Additional resources that will help you build up knowledge on boat wiring
Organizations to contact to learn more about boat wiring
- The American Boat and Yacht Council provides industry standards and education resources for wiring recreational vessels.
4 Boat wiring diagrams
A simple boat wiring diagram – basic 12 volt boat wiring diagram

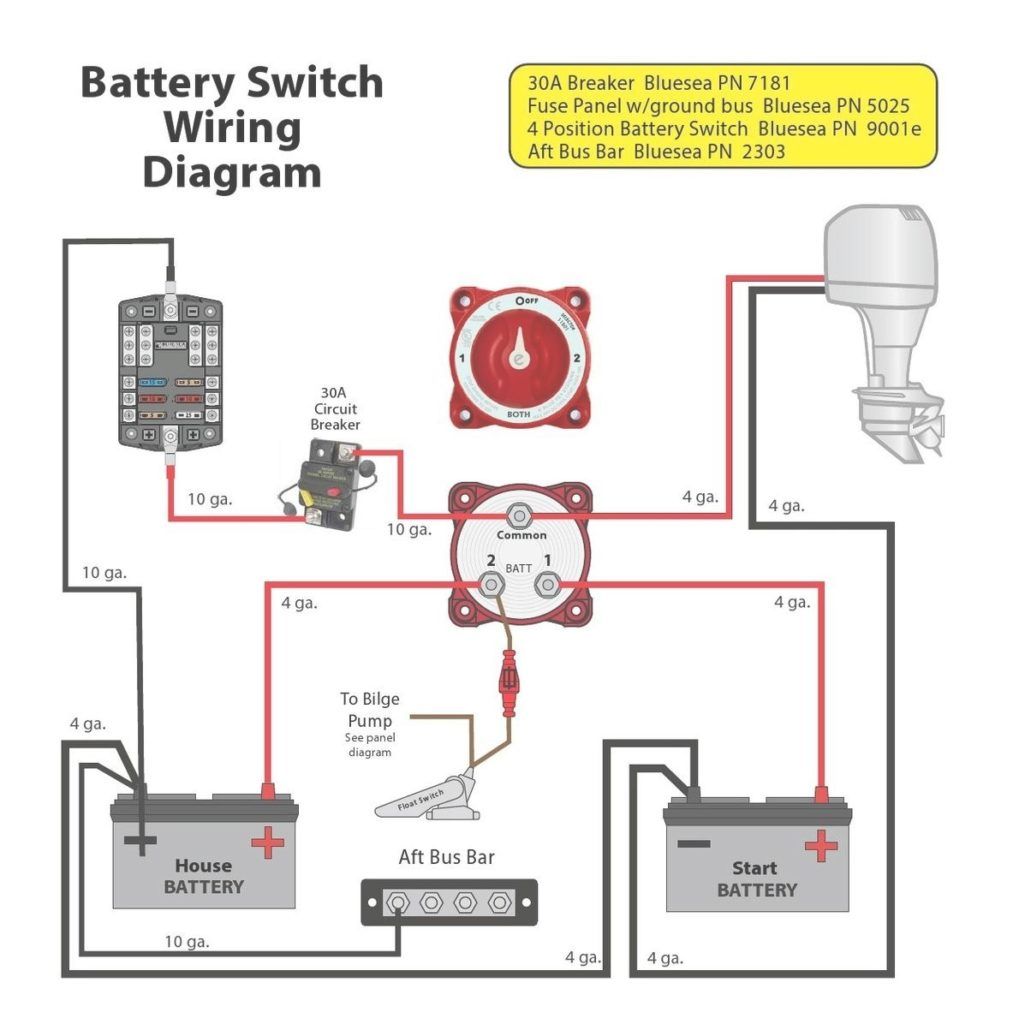
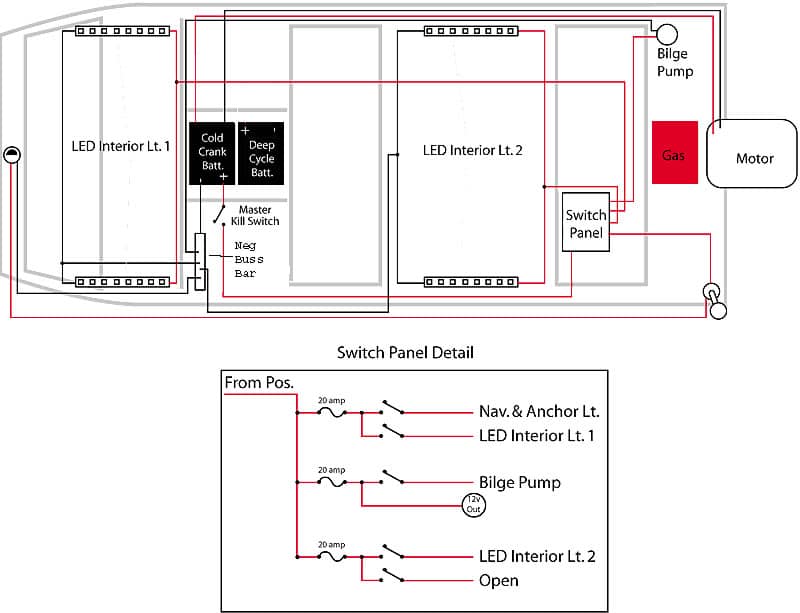
2 battery boat wiring diagram
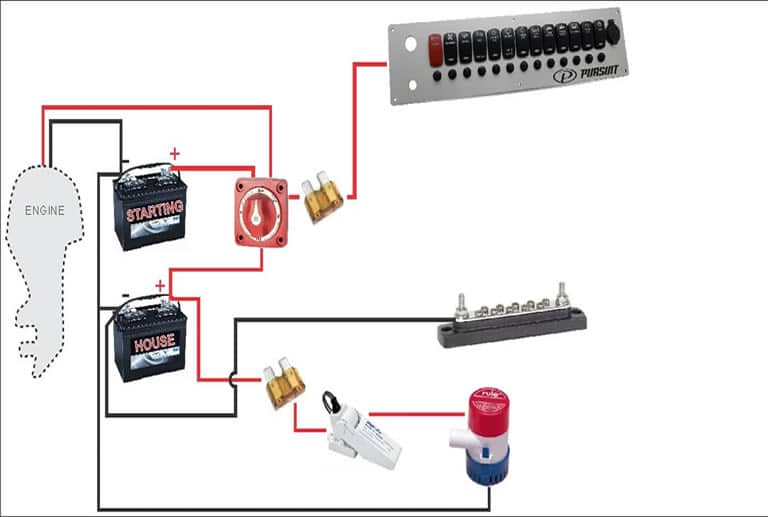
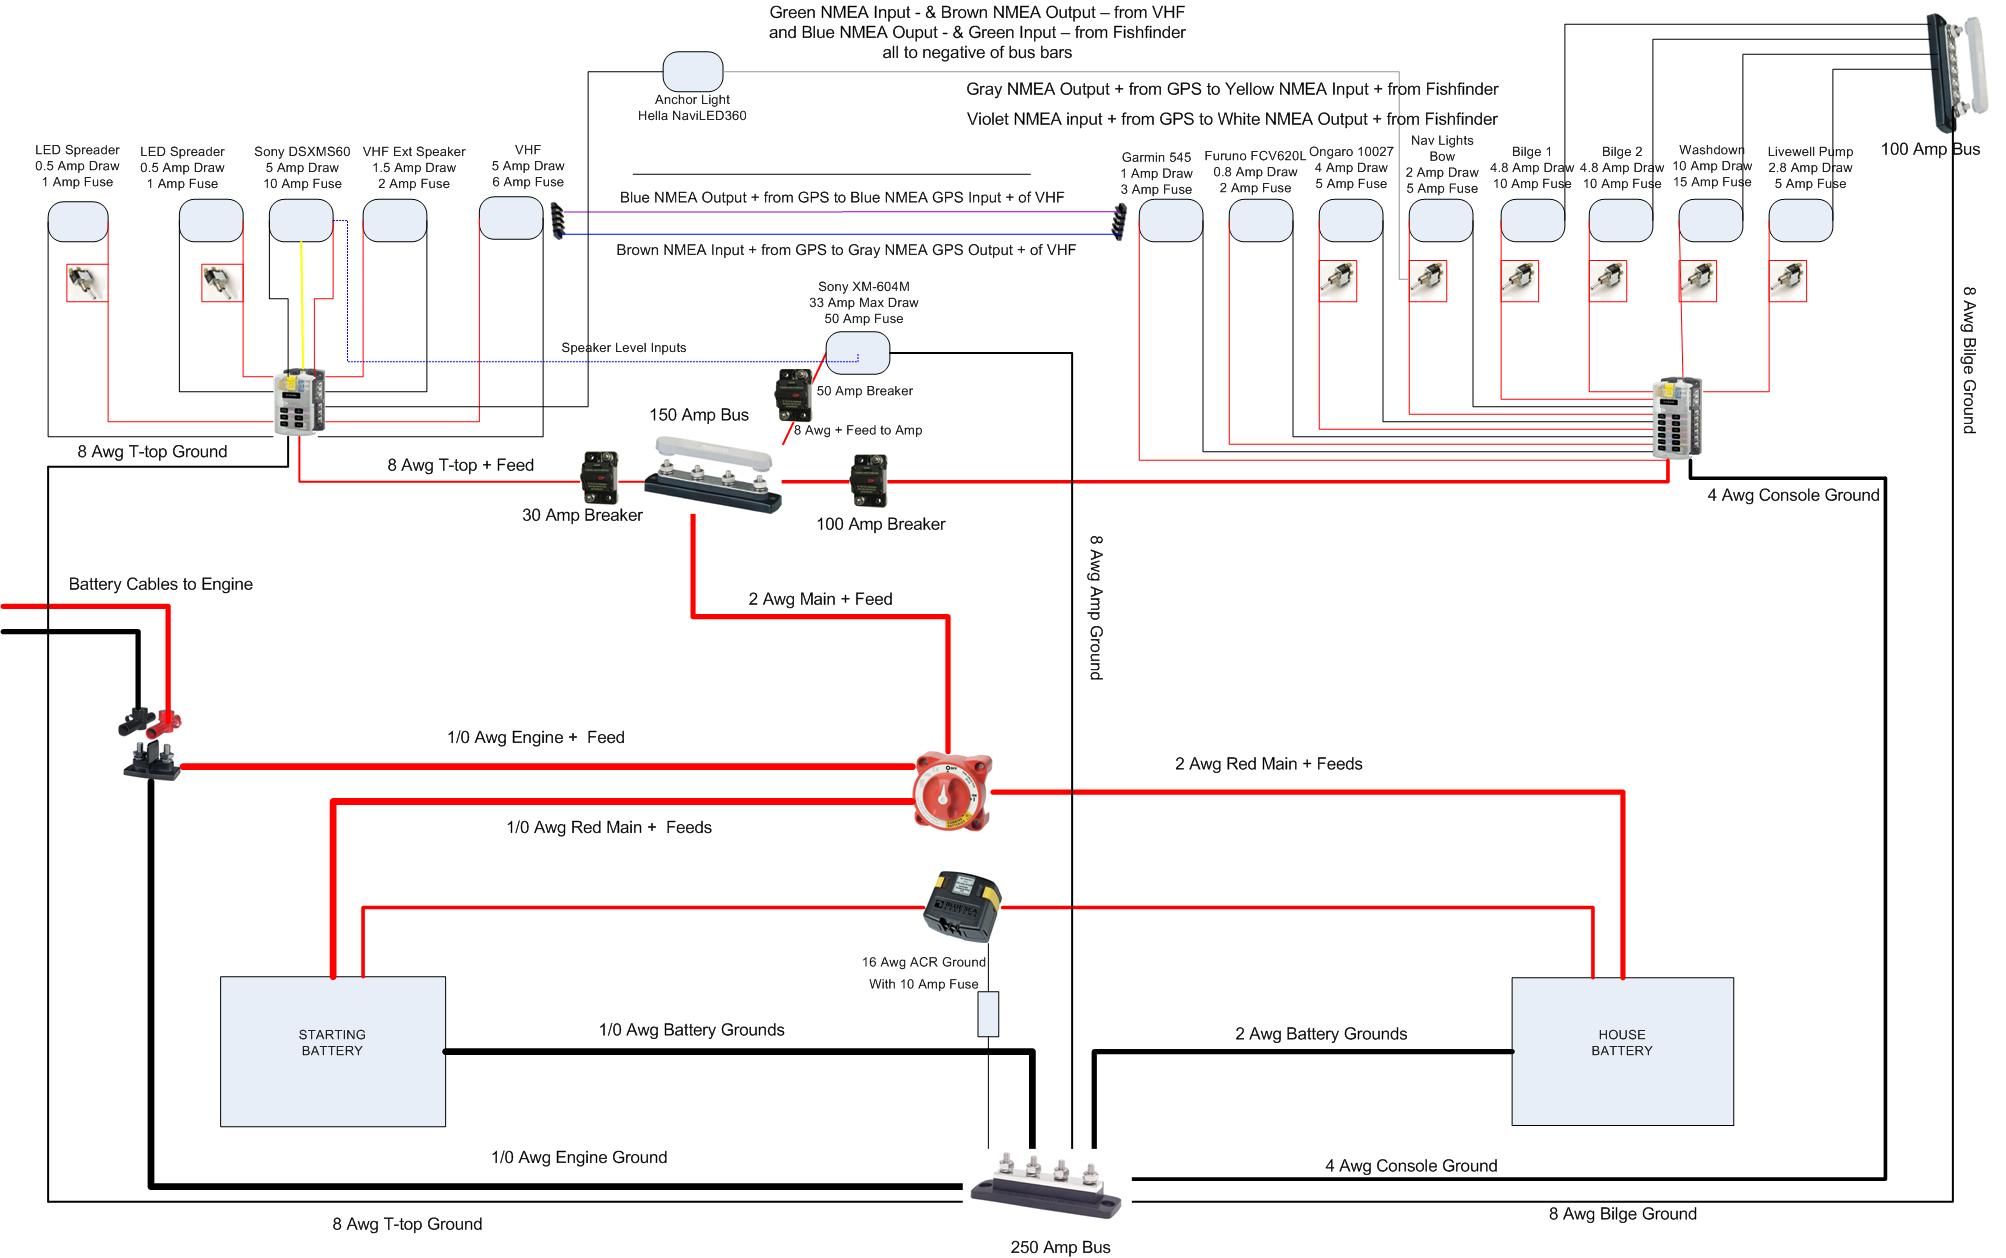
Full spec small boat wiring diagram
Jon boat wiring diagram
In conclusion: how to wire boat lights & other boat electrical systems
If you are used to DIY projects on your Jon boat, wiring is going to be a task you will have to encounter at some point.
Despite the apparent simplicity of Jon boat wiring, safety is always paramount. Getting assistance from a professional or at least a boater who is experienced in marine wiring is prudent.
Once you have mastered the principles of safe wiring, the scope of your projects and the performance of your boat will increase massively.